-
Archive Full Bacula Backups to Removable Hard Drive.
I have my backups set to do Incremental backups daily, Differential backups on the weekend and Full backups on the first Saturday of the month. I then use the Copy function in Bacula to copy the full backups onto a removable hard drive for archiving. I keep a drive for every month and recycle them after a year keeping the end of year safe.
It took a little digging around the internet to figure out how to get this working but I was able to get it all working and it works great.
# This is your normal backup poll for your full backups.
# Add the NextPool option shown below to your existing pool.Pool {
Name = BackupPool
Pool Type = Backup
Volume Retention = 6 months
Recycle = yes
AutoPrune = yes
LabelFormat = BU-
Maximum Volume Bytes = 50G
Storage = BackupSD
NextPool = FullBackupsDiskPool #### Added this for Archive
}#########################################################################
# Archive to USB
#########################################################################Pool {
Name = FullBackupsDiskPool
Pool Type = Backup
Recycle = yes
AutoPrune = yes
Volume Retention = 2 years
Storage = Archive
LabelFormat = A-
}#
# Fake fileset for copy jobs
#
Fileset {
Name = None
Include {
Options {
signature = MD5
}
}
}#
# Fake client for copy jobs
#
Client {
Name = None
Address = localhost
Password = “NoNe”
Catalog = MyCatalog
}#
# Default template for a CopyDiskToTape Job
## Schedule for Archive
# I run mine manually so this schedule doesn’t really do anything… Enabled = No
#
Schedule {
Name = AfterFullBackups
Run = Level=Full Pool=BackupPool 2nd fri at 20:30
}#Job – This is what to run when you want to move full backups to archive drive.
Job {
Name = CopyDiskToDiskFullBackups
Enabled = No
Schedule = AfterFullBackups
Pool = BackupPool
JobDefs = CopyDiskToDisk
Write Bootstrap = “/BackupNAS/BaculaBootstraps/%c_%n_%f.bsr”
}#This is where we set to get the Full backups for the last “5” days.
#You could change this but it works fine for me since I only have some small
#jobs that run as full daily in POOL 15, you’ll need to change the poolID!!!JobDefs {
Name = CopyDiskToDisk
Type = Copy
Messages = Standard
Client = None
FileSet = None
Selection Type = SQLQuery
Selection Pattern = “select * from Job where ClientID <> 2 AND (EndTime BETWEEN NOW() – INTERVAL 5 DAY AND NOW()) AND Level = ‘F’ AND (JobStatus = ‘e’ OR JobStatus = ‘T’) AND PoolID = 15;”
Maximum Concurrent Jobs = 10
SpoolData = No
Allow Duplicate Jobs = Yes
Cancel Queued Duplicates = No
Cancel Running Duplicates = No
Priority = 13
}Storage {
Name = Archive
Password = *************
Address = *************
SDPort = 9103
Device = Archive
Media Type = File
Maximum Concurrent Jobs = 20
}Finding your Pool ID
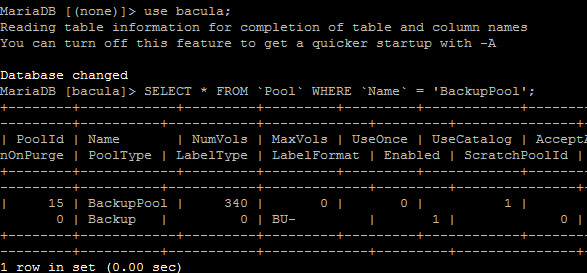
The pool ID for can be found by looking in the bacula database in the Pool table using the following statement.
How to access the database through SSH
SSH into your Bacula server or server with the Bacula database. Log into MySql (or MariaDB) and then enter use bacula; (where bacula is the name of your bacula database). Then enter the following select statement to find the PoolID (Note my backup pool for my full backups is called BackupPool and I can see the PoolID is 15.)
SELECT * FROM `Pool` WHERE `Name` = ‘BackupPool’
Setting the Storage Device
Now you need to set the storage to use the archive mount. This is set in bacula-sd. In my case, I called the mount /archive but you can call it what you want.
Device {
Name = Archive
Archive Device = /archive/
Media Type = File
LabelMedia = yes
Random Access = yes
AutomaticMount = yes
RemovableMedia = no
AlwaysOpen = no
}Mounting the removable drive using Webmin
Open Webmin and go to Hardware>Partitions on local disks and find the device that’s the removable drive. In my case, it’s SCSI device A. I’m using 4TB HGST drives in a USB 3.0 cradle and it works great. I can power it off, swap drives and power it back on and I can format the drive like I want.Mount the drive by going to System>Disks and Network Filesystems and click Add and choose the type. I use ext4 for my drives. “Mounted as” should be the same as the directory you used in the bacula-sd config and select the removable drive. You will need to create this directory first before mounting a drive to it. I selected YES to Wait until network interfaces are up even though this isn’t a network drive to allow time for the USB drivers to kick in before the system tries to mount the USB drive. Make sure Mount Now is set to Mount and you should be able to mount the drive by hitting save. If there is an error, make sure you have formatted the drive correctly and that you have created
Once it’s mounted, you should be able to see the drive, it should show it’s in use and you will need to give bacula permission to write to this drive.
How to Run the job
Since I watch the backups, I know when all the full backups are completed and I will manually start the archive job. I just go to Webmin and click on the “CopyDiskToDiskFullBackups” job and select Run. This job is super fast and usually takes about 2 hours for 1.2TB of full backups to be copied for me.
Hope this helps!


